
Self-Hosting osTicket in my Homelab
Table of Contents
Introduction
This year, life circumstances required me to move to a different city to be closer to my job. As part of that change, I converted my condominium into a rental property. Along with the move came the bookkeeping and maintenance responsibilities of providing an accommodating experience to tenants.
Recently, a tenant reached out with concerns about the performance of the central air conditioning unit. The was the first official maintenance request I had received. Requests like this involve coordination, scheduling, and often expense, so handling everything manually over text and phone calls was not preferable. As a self-hosting enthusiast and software engineer, I wanted a tool that makes it easy for tenants to submit maintenance requests as tickets. A ticket lets them describe the issue in as much detail as possible, including pictures and video. This provides me with the information that I need to take proper action, and allows me to break a request down into individual tasks, such as scheduling a professional visit, and attach receipts to those tasks for bookkeeping.
This use case extends beyond my rental property. Since I already host applications in my homelab that friends and family use, the same ticketing system gives them a way to request help or suggest new functionality. This post covers the steps I took to deploy osTicket in my homelab and make the service available on the Internet.
Bare-Metal Exploration
I deploy the majority of my homelab services with Docker. Even so, I like to explore a new tool on bare metal first. Understanding how an application installs, what it depends on, and where it stores state makes containerization far easier later. It also saves me from debugging obscure configuration and permission problems through a container boundary I don’t yet understand.
First Attempt: Ubuntu 26.04 LTS
The latest Ubuntu LTS release at the time was 26.04, so I spun up a VM with that version to start. osTicket is a PHP application served by Apache, so before downloading the source I installed the required dependencies:
sudo apt update -y && sudo apt install -y php libapache2-mod-php php-mysql php-cgi php-cli php-curl php-gd php-imap php-apcu php-mbstring php-xml php-intl php-zip unzip wget

Package php-imap is not available, but is referred to by another package.
This may mean that the package is missing, has been obsoleted, or
is only available from another source

Error: Package 'php-imap' has no installation candidate
The error indicates that php-imap has been dropped from the package repositories in this release of Ubuntu. While I could build the extension from source, I preferred the simpler route: falling back to the 24.04 LTS release and trying again.
Falling Back to Ubuntu 24.04 LTS
sudo apt update -y && sudo apt install -y php libapache2-mod-php php-mysql php-cgi php-cli php-curl php-gd php-imap php-apcu php-mbstring php-xml php-intl php-zip unzip wget

Running hooks in /etc/ca-certificates/update.d...
done.
Processing triggers for php8.3-cli (8.3.6-0ubuntu0.24.04.10) ...
Processing triggers for php8.3-cgi (8.3.6-0ubuntu0.24.04.10) ...
Processing triggers for libapache2-mod-php8.3 (8.3.6-0ubuntu0.24.04.10) ...
invoke-rc.d: could not determine current runlevel
invoke-rc.d: policy-rc.d denied execution of restart.
Great, the system is ready to run osTicket. The commands below is the full, self-contained set of commands. It runs the dependency install and downloads and installs version 1.18.4 of the application:
# 1. Update OS and install Apache and all PHP 8.3 extensions
sudo apt update && sudo apt upgrade -y
sudo apt install apache2 php libapache2-mod-php php-mysql php-cgi php-cli php-curl php-gd php-imap php-apcu php-mbstring php-xml php-intl php-zip unzip wget -y

# 2. Enable Apache rewrite module as per the documentation's prerequisites
sudo a2enmod rewrite
sudo systemctl restart apache2

# 3. Download and Extract osTicket
cd /tmp
wget https://github.com/osTicket/osTicket/releases/download/v1.18.4/osTicket-v1.18.4.zip
unzip osTicket-v1.18.4.zip -d osticket
sudo mv osticket/upload /var/www/html/osticket

# 4. Set File Permissions for the Installer
cd /var/www/html/osticket/include
sudo cp ost-sampleconfig.php ost-config.php
sudo chown -R www-data:www-data /var/www/html/osticket

# 5. Post-Installation Cleanup (After web setup is complete)
sudo rm -rf /var/www/html/osticket/setup
sudo chmod 0644 /var/www/html/osticket/include/ost-config.php
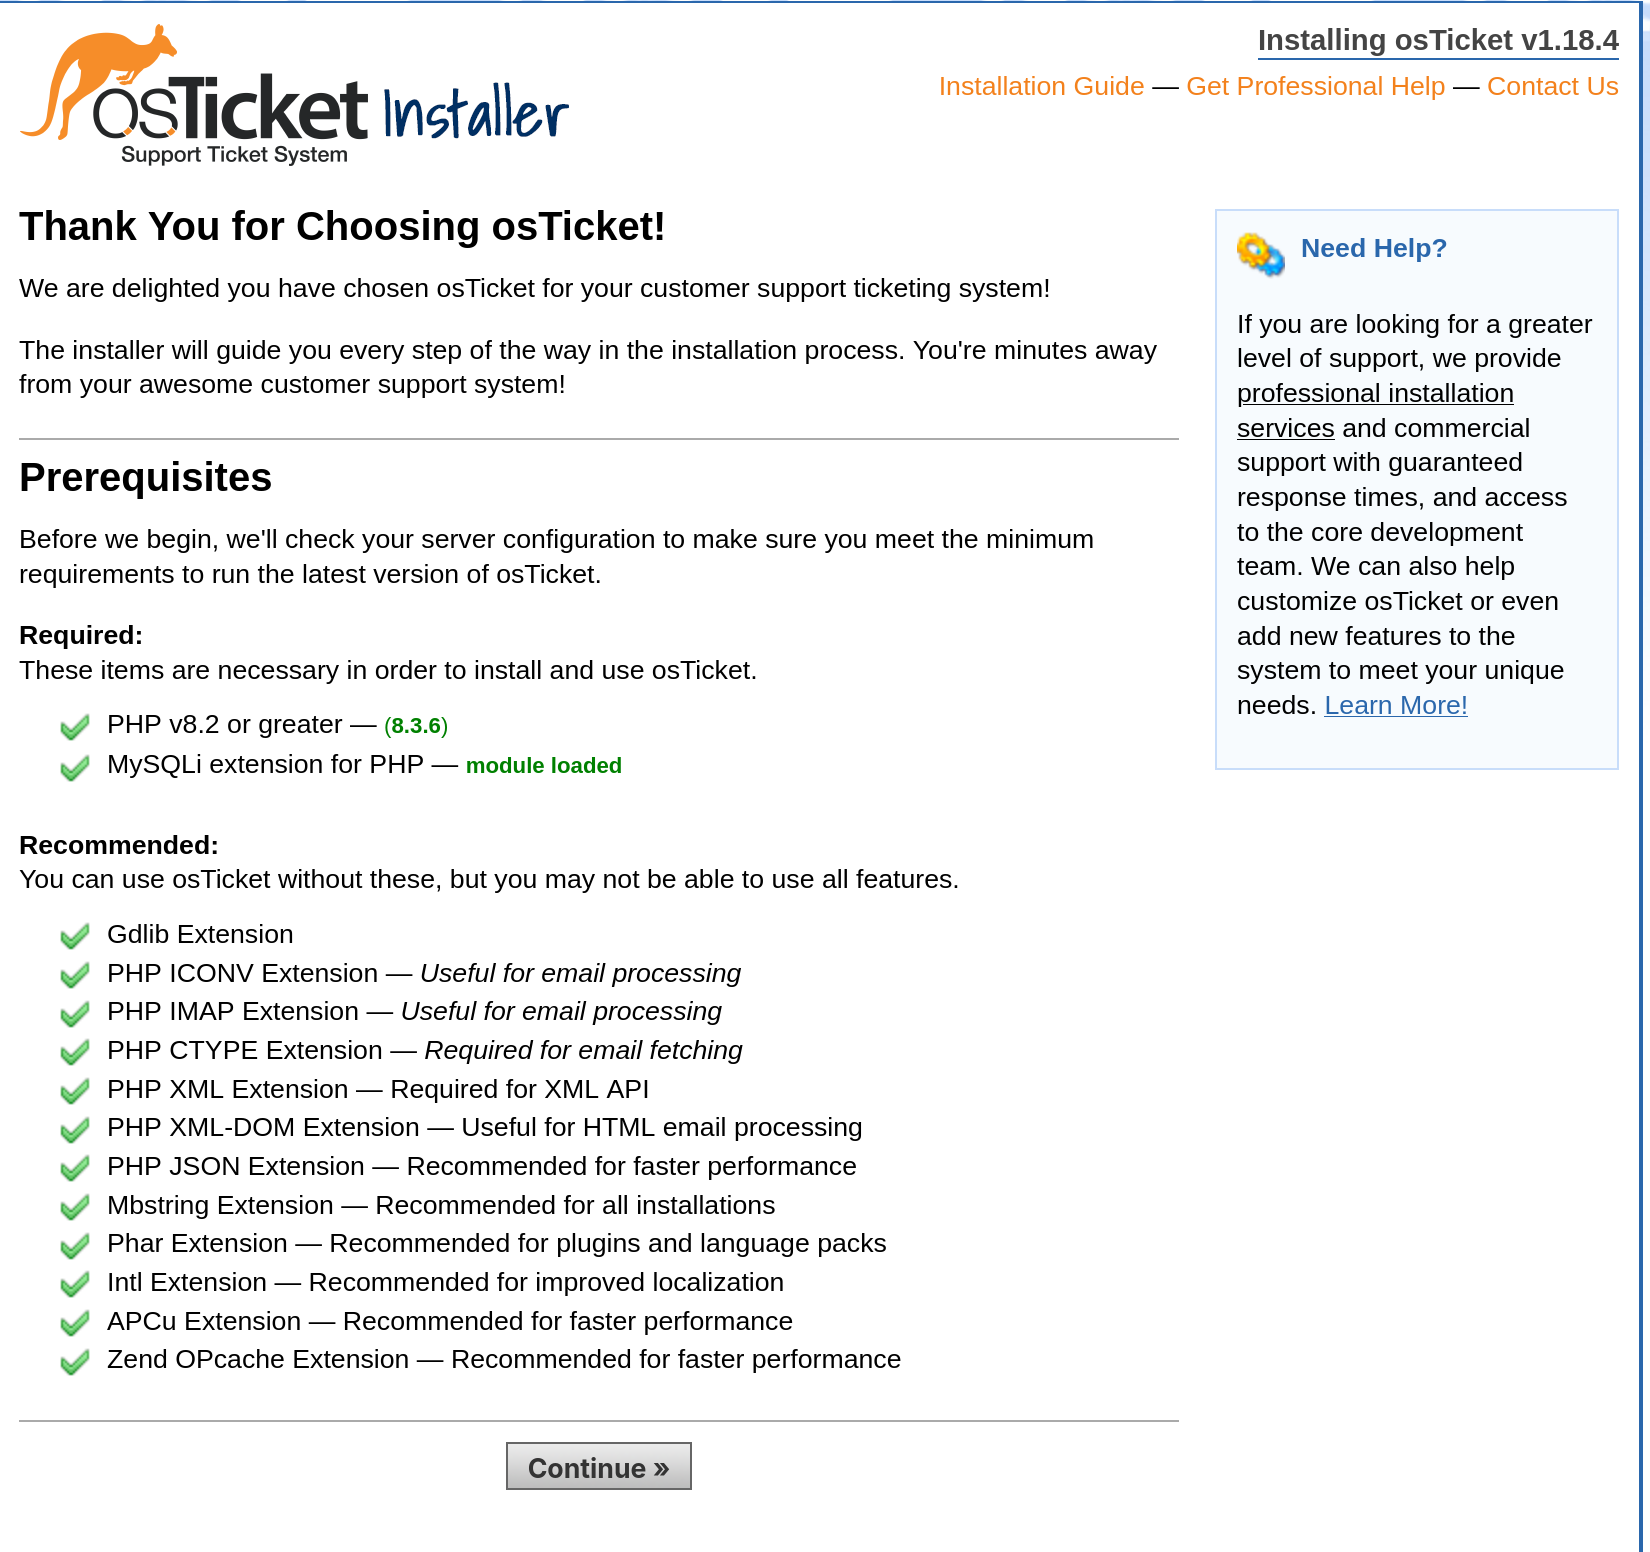
Between steps 4 and 5, you’ll visit the application’s web GUI to run the installation wizard. On first load, you’ll see a page that indicates whether you have all the required and recommended extensions installed (e.g. php-imap). In this case we do, and can proceed through the wizards to configure our MySQL database. MySQL should have a database ready prior to proceeding with step 5 from above.
Database
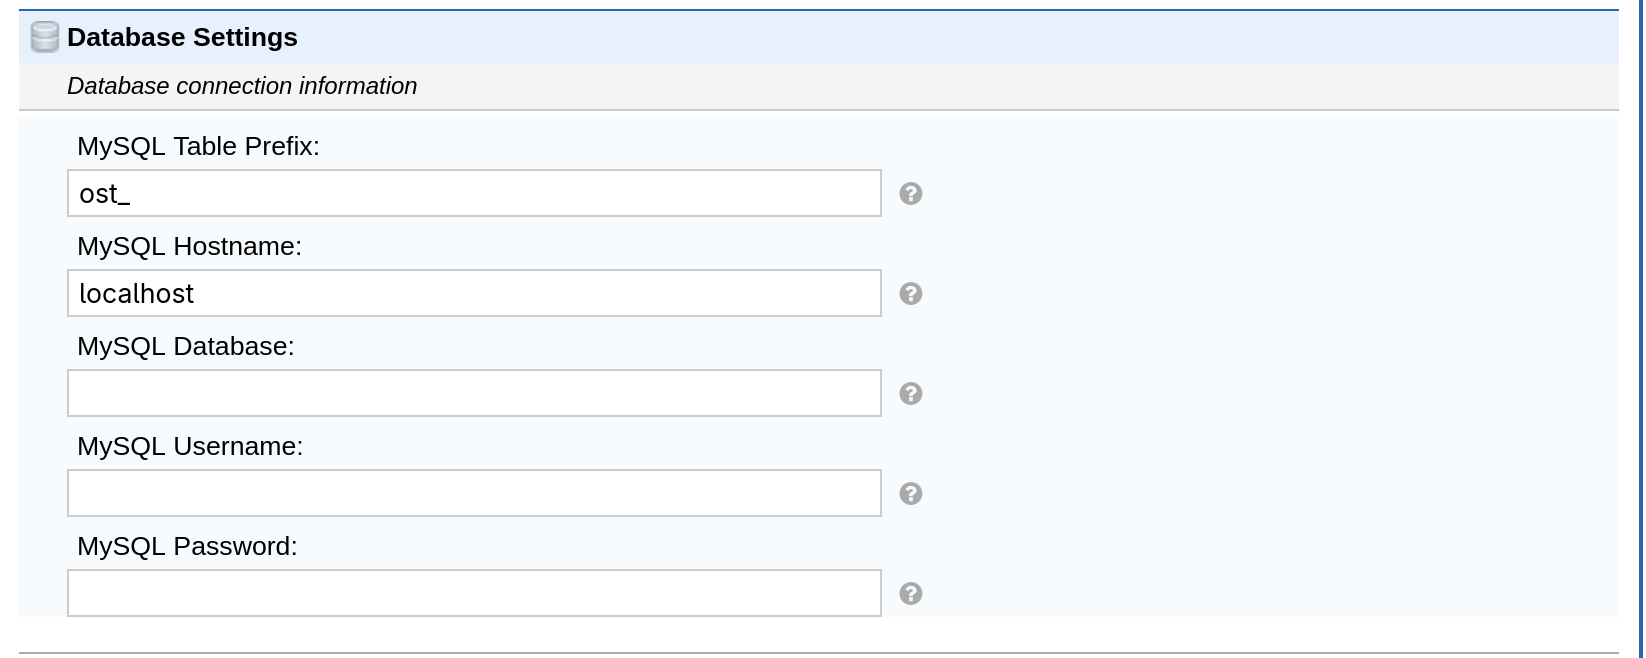
I run a MySQL instance that backs several applications in my homelab, so the only work here was preparing a dedicated database and user for osTicket. Rather than reproduce my exact setup, the statements below outline the general steps needed to make a MySQL instance ready for osTicket. Adapt them to your environment, and treat security and encryption as your own due diligence:
CREATE DATABASE osticket;
CREATE USER 'osticketuser'@'localhost' IDENTIFIED BY 'StrongPassword';
GRANT ALL PRIVILEGES ON osticket.* TO 'osticketuser'@'localhost';
FLUSH PRIVILEGES;
EXIT;
With the database in place, the installation wizard can connect to it and finish configuring the application.
Containerization with Docker
Now that we understand how to run osTicket on bare metal, we can begin containerizing it. The project doesn’t publish an official Docker image maintained by its developers, so we have to build one ourselves. In my case, I’m deploying to a Docker Swarm cluster.
Two things we observed during the bare-metal install shape this design. First, the application writes to ost-config.php, which makes the source directory stateful. Second, the installer asks us to delete the setup directory once configuration is complete. Because the source files are mutated at runtime, I chose not to bake them into the image. Instead, I bind-mount them from the Docker host, so the container is simply a prepared environment that runs whatever source lives on the host.
# Start from our proven Ubuntu 24.04 base
FROM ubuntu:24.04

# Prevent interactive prompts (like timezone selection) from freezing the build
ENV DEBIAN_FRONTEND=noninteractive

# Update and install Apache, PHP 8.3, and all required extensions
RUN apt-get update && \
    apt-get install -y \
    apache2 \
    php \
    php-mysql \
    php-cgi \
    php-cli \
    php-curl \
    php-gd \
    php-imap \
    php-apcu \
    php-mbstring \
    php-xml \
    php-intl \
    php-zip \
    unzip \
    wget && \
    apt-get clean && \
    rm -rf /var/lib/apt/lists/*

# Enable the Apache rewrite module
RUN a2enmod rewrite

# Enable cgi.fix_pathinfo so PHP can extract PATH_INFO from URLs.
# osTicket relies heavily on background AJAX endpoints (like dynamic drop-downs,
# modal popups, and user lookups at /ajax.php/path/to/resource). Without this,
# PHP fails to parse the trailing paths and breaks the interactive web dashboard.
# The max file size is also increased to allow for larger attachments in tickets.
RUN echo "cgi.fix_pathinfo=1\nupload_max_filesize=128M\npost_max_size=128M\n" > /etc/php/8.3/mods-available/osticket.ini && \
    phpenmod osticket

# Set the working directory to the osTicket installation
WORKDIR /var/www/html/osticket

# Expose the standard web port
EXPOSE 80

# Start Apache in the foreground so the container stays running
CMD ["apachectl", "-D", "FOREGROUND"]
Note that the image is named osticket-env rather than osticket. The -env suffix is intentional: the image is only the runtime environment (Apache, PHP, and the required extensions), not the osTicket application itself. The application source is supplied separately via the bind-mount described above.
I built the image and pushed it to my self-hosted Docker registry, making it available to the Swarm cluster:
docker buildx build --platform="linux/arm64" --tag "registry.manedurphy.com/manedurphy/osticket-env:1.18.4" --push .
Deployment
On the Docker host, I staged the application source files at /mnt/data/osticket, which is the same directory the compose/stack file bind-mounts into the container. This mirrors the bare-metal preparation from earlier: download the release, extract the upload/ directory to the mount path, and seed the config file. The one difference is ownership. My Docker host doesn’t have a www-data user, so instead of chown www-data:www-data I set ownership to 33:33, the numeric UID and GID that the www-data user and group map to inside the Ubuntu-based container. This ensures Apache in the container can read and write the bind-mounted files.
# From the Docker host
cd /tmp
wget https://github.com/osTicket/osTicket/releases/download/v1.18.4/osTicket-v1.18.4.zip
unzip osTicket-v1.18.4.zip -d osticket
sudo mv osticket/upload /mnt/data/osticket
sudo cp /mnt/data/osticket/include/ost-sampleconfig.php /mnt/data/osticket/include/ost-config.php
# 33:33 matches the www-data UID:GID inside the container, since the host has no www-data user
sudo chown -R 33:33 /mnt/data/osticket
The snippet below is an excerpt from a larger stack file; the lab network is an existing network shared with the other services in my homelab. With the source staged and the stack deployed, the installation wizard runs exactly as it did on bare metal.
  osticket:
    image: registry.manedurphy.com/manedurphy/osticket-env:1.18.4
    hostname: osticket
    deploy:
      mode: replicated
      replicas: 1
      placement:
        constraints:
          # Deploying to manager node since application source files are bind-mounted
          - node.role == manager
    volumes:
      # Source files for the target version of the application are bind-mounted
      - /mnt/data/osticket:/var/www/html/osticket
    networks:
      - lab
Email Configuration
Since osTicket can create tickets from incoming email, I needed an email provider that lets me host multiple addresses behind a single domain (e.g. [email protected], [email protected]). The cheapest option I found was PurelyMail, which allows unlimited addresses on a domain for $10 a year. This easily justified the cost for this use case. After creating the addresses I needed, I configured osTicket to poll each inbox over IMAP and open a ticket from any new message. This way, a tenant who would rather not use the web portal can simply send an email, and the application creates the ticket on their behalf.
Exposing the Service on the Internet
The container listens on plain HTTP. I already run an Nginx reverse proxy that terminates TLS and routes traffic to the various applications and services across my homelab, so exposing osTicket was a matter of adding a new server block rather than standing up new infrastructure. The snippet below is the block I added to serve the application at support.manedurphy.dev. The certificate is a Cloudflare origin certificate for the manedurphy.dev domain. A couple of details are worth calling out: client_max_body_size 0 removes Nginx’s upload limit so it doesn’t reject the ticket attachments the application is configured to accept, and the bare root is redirected to the /osticket/ subpath where the application is served.
# HTTPS server configuration for support.manedurphy.dev
server {
    listen 443 ssl;
    http2 on;
    server_name support.manedurphy.dev;

    set $application "osticket";

    access_log /var/log/nginx/support.manedurphy.dev.access.log json_logs;
    error_log /var/log/nginx/support.manedurphy.dev.error.log;

    # No limit on request body size (for ticket attachments)
    client_max_body_size 0;

    # Paths to the Cloudflare SSL certificate and key for the manedurphy.dev domain
    ssl_certificate /etc/ssl/certs/manedurphy.dev.crt;
    ssl_certificate_key /etc/ssl/private/manedurphy.dev.key;

    # Redirect bare root to the osticket subpath
    location = / {
        return 301 https://support.manedurphy.dev/osticket/;
    }

    location /osticket/ {
        proxy_pass http://osticket;
    }
}
Conclusion
With osTicket deployed, email intake configured, and TLS terminated at the edge, tenants now have a simple way to submit maintenance requests, and may attach the photos and video that help me act on an issue quickly. Behind the scenes, each request becomes a ticket I can break into tasks and tie receipts to for bookkeeping. The same system doubles as a support desk for the friends and family who use other applications in my homelab.
Along the way, the bare-metal exploration paid off: understanding the application’s dependencies and stateful config file directly informed the decision to bind-mount the source rather than bake it into the image. That approach keeps the container a disposable environment while the application’s data and configuration live safely on the host. Be sure to backup your MySQL database and stateful osTicket configuration file regularly.